
Using IAM Roles Anywhere instead of IAM Keys
- Apr 13
- 5 min read

Introduction
In hybrid and multi-cloud environments, one of the biggest challenges is enabling secure access to cloud resources without relying on static credentials such as IAM access keys. As organizations integrate on-premises workloads, edge devices, and services running in other clouds with AWS, identity management becomes a critical piece of the architecture.
AWS IAM Roles Anywhere addresses this challenge by allowing systems outside of AWS to authenticate using X.509 certificates and assume IAM roles securely. Instead of distributing long-lived access keys, workloads use certificates to obtain short-lived credentials through AWS Security Token Service, aligning with modern security practices such as Zero Trust.
This approach shifts the model from shared secrets to verifiable identities backed by PKI. The required X.509 certificates can be issued either by an existing enterprise PKI or by using AWS Private Certificate Authority, making it flexible enough to integrate with current security infrastructures.
Testing IAM Roles Anywhere
Let's look at an example where we'll use a private/local CA to generate certificates and configure an on-premises server to access an S3 bucket and interact with objects using IAM Roles Anywhere. For this test example, we'll:
Generate certificates for a private/local CA
Establish a trusted anchor between AWS and our CA
Create and configure a Role
Configure a Profile
Generate certificates for our on-premises server
Configure the profile on the server
Test access to AWS services
Step 1 - Generate certificates for a private/local CA
The first thing we need to do is generate a private key for our CA, which we'll call ca.key. We can generate this key with OpenSSL, and it's very important to store it securely.
openssl genrsa -out ca.key 4096 |
Next, we'll create a configuration file called ca.cnf, where we'll define the organization's details. Example:
[ req ] default_bits = 4096 prompt = no default_md = sha256 distinguished_name = dn x509_extensions = v3_ca [ dn ] C = AR ST = Buenos Aires L = Pergamino O = Teracloud OU = DevOps CN = Facundo Montero emailAddress = facundo.montero@teracloud.io [ v3_ca ] basicConstraints = critical, CA:TRUE, pathlen:0 keyUsage = critical, keyCertSign, cRLSign subjectKeyIdentifier = hash authorityKeyIdentifier = keyid:always |
Finally, using the private key and the configuration file, we will generate the CA's public certificate, ca.crt. When generating this certificate, we can define the number of days of validity:
openssl req -new -x509 \\n -days 365 \\n -key ca.key \\n -out ca.crt \\n -config ca.cnf\n |
Step 2 - Establish a trusted anchor between AWS and our CA
To access the IAM Roles Anywhere configuration from the console, we must go to the end of the Roles configuration in IAM:

Here, for AWS to recognize our CA as valid and establish trust, we need to configure the CA's public certificate in Roles Anywhere. To do this, we need to set a name for the trust relationship, specify that it's an external certificate, and paste the content of the ca.crt file:

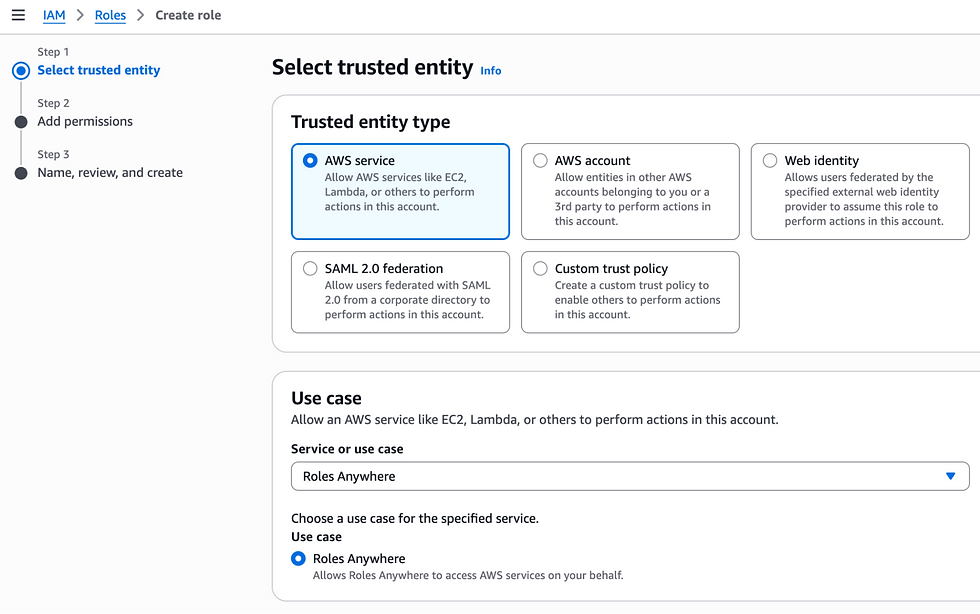
Step 3 - Create and configure a Role
Now we need to create an IAM Role, where in the creation steps, we will specify that the use case is for Roles Anywhere:
Next, we select the policies that the Role will have permission to; in this example, we will use the AWS-managed AmazonS3FullAccess policy.

Finally, we will define a name for the Role and see that it has a Trust Policy configured so that the Roles Anywhere service can assume the Role:

Step 4 - Configure a Profile
Once the Role is created, we must create a Profile in Roles Anywhere, where we will define a name and the Role created in the previous step. Optionally, we can configure a Session Policy to limit the permissions granted by the Role, and we can also configure the session duration time, which is one hour by default.

Once created, we will see the Trust Anchor and Profile values configured as follows in the console:

Step 5 - Generate the certificates for our on-premise server
Next, we need to generate the certificates for the server that will use the profile; this must be signed by the CA we created earlier. To do this, we first create a server.cnf file with the server details:
[ req ] default_bits = 2048 prompt = no default_md = sha256 distinguished_name = dn x509_extensions = v3_ca [ dn ] C = AR ST = Buenos Aires L = Pergamino O = Teracloud OU = DevOps CN = mi-servidor emailAddress = facundo@jcaii.ca [ v3_ca ] basicConstraints = critical, CA:FALSE keyUsage = critical, digitalSignature, keyEncipherment subjectKeyIdentifier = clientAuth authorityKeyIdentifier = hash |
Next, we generate a private key, server.key, for the server:
openssl genrsa -out server.key 2048 |
Then, we generate the server's server.csr file (Certificate Signing Request):
openssl req -new \ -key server.key \ -out server.csr \ -config server.cnf |
And we generate the server.crt certificate, where we sign it with the CA certificates; when generating it, we can define the number of days of validity:
openssl x509 -req \ -in server.csr \ -CA ca.crt \ -CAkey ca.key \ -CAcreateserial \ -out server.crt \ -days 365 \ -sha256 \ -extfile server.cnf \ -extensions v3_req |
We can verify that the chain of trust is correct with the command:
openssl verify -CAfile ca.crt server.crt |
We need to upload the server.crt and server.key files to the server. In this example, it will be inside the /etc/aws/rolesanywhere/ folder.
Step 6 - Configure the profile on the server
A very important step is that on the server we are going to work on, we must install the Signing Helper library to obtain the temporary credentials and be able to use the profile:
curl -Lo aws_signing_helper https://rolesanywhere.amazonaws.com/releases/1.7.2/X86_64/Linux/Amzn2023/aws_signing_helper chmod +x aws_signing_helper sudo mv aws_signing_helper /usr/local/bin/ |
We configure the permissions within a profile in the ~/.aws/config file; on some systems, it is important to write it on a single line, to avoid errors when reading the parameters:
[profile mi-servidor] region = us-east-1 credential_process = /usr/local/bin/aws_signing_helper credential-process --region us-east-1 --certificate /etc/aws/rolesanywhere/server.crt --private-key /etc/aws/rolesanywhere/server.key --trust-anchor-arn arn:aws:rolesanywhere:us-east-1:756003157369:trust-anchor/bcn5fdc2-56u3-4d55-a4a3-932c90fcc63b --profile-arn arn:aws:rolesanywhere:us-east-1:756003157369:profile/4e1C84s0-c20b-4p07t-0983r-8744912 --role-arn arn:aws:iam::756003157369:role/EjemploRolesAnywhere |
Step 7 - Test access to AWS services
Once everything is configured, we need to test the profile on the server and verify that it works correctly. For this, we can use the AWS CLI and check that the identity is valid:
aws sts get-caller-identity --profile mi-servidor { "UserId": "DREAZS353SACNNSMMSZPM:8713b1b390710894f86205281ca62c028367bc06", "Account": "756003157369", "Arn": "arn:aws:sts::756003157369:assumed-role/EjemploRolesAnywhere/8713b1b390710894f86205281ca62c028367bc06" } |
Once the identity is verified, we can list the contents of a bucket in our account or upload a file:
aws s3 ls s3://your-bucket --profile mi-servidor |
aws s3 cp objeto.txt s3://your-bucket/objeto.txt --profile mi-servidor |
We can also use the profile from a Python script with boto3. This is an example of uploading a file to a bucket. By default, it will try to retrieve the bucket name and profile values from the system's environment variables; if it doesn't find them, it will use the values defined in the script:
import os import boto3 from botocore.exceptions import BotoCoreError, ClientError BUCKET_NAME = os.environ.get("BUCKET_NAME", "your-bucket") AWS_PROFILE = os.environ.get("AWS_PROFILE", "mi-servidor") FILE_NAME = "objeto.txt" OBJECT_NAME = "objeto.txt" def upload_file(): try: session = boto3.Session(profile_name=AWS_PROFILE) s3 = session.client("s3") s3.upload_file(FILE_NAME, BUCKET_NAME, OBJECT_NAME) print(f"Archivo '{FILE_NAME}' subido a s3://{BUCKET_NAME}/{OBJECT_NAME}") except FileNotFoundError: print("El archivo no existe") except (BotoCoreError, ClientError) as e: print(f"Error al subir el archivo: {e}") if name == "__main__": upload_file() |
Conclusion
This example shows us how straightforward it is to configure IAM Roles Anywhere on a server. Once set up, it can be used just like a standard AWS profile backed by IAM access keys, making adoption seamless for existing workflows.
However, the key advantage lies in its security model. By leveraging AWS Security Token Service, IAM Roles Anywhere provides short-lived, automatically rotated credentials. This eliminates the need for managing long-lived access keys, reducing operational overhead and significantly lowering the risk associated with credential leakage.

Facundo Montero
Cloud Engineer


